No products in the cart.

The photo influences the decision to buy more than anything else – good pictures sell!
Compose close, crop hard (fill the image with your jewellery), enhance the contrast, and reduce image size for a fast download.
The Camera

Most digital cameras can produce good images for the web. Even phones – the iPhone and iPad have an excellent camera.
They focus close, recording sharp images with high contrast. However, the connoisseur looking for the best tool should favour a digital SLR, where extra manual features make life a little easier. When choosing a camera, make sure it will focus close enough to fill its screen with your product.

These days lots of people use their phone or ipad to photograph. Smart phone lenses have improved dramatically over the years - its amazing just how good their images can be. The phone's software can also be used to edit and enhance the picture. Make sure you get in close and switch the flash off. Flash on the camera 'burns out' and makes the picture look terrible.

To allow you to focus even closer, it’s very cheap to purchase a click-on macro lens, these often come with a wide-angle lens and can be clipped onto phones too (as pic). Just Google, ‘clip on macro lens’, or buy on eBay.
Illumination
It is possible to use almost any type of lighting, although bright even light is important for the best results. Your camera’s flash will give a flat image with nasty distracting shadows. So for the simplest photography, switch your flash off and stick to daylight lighting.
Daylight
Close to a large window will give lots of soft light, but illustrate your item unevenly. To reduce this problem, cut a piece of white card and prop it up facing the window to reflect the light and fill in the shadows.
Balance the light

Alternatively use a small mirror or a folding reflector – be sure not to get it in the picture. Your camera’s flash may fill-in the shadows similarly, but you will need a lot of experimenting to prevent the flash overpowering and leaving a shadow. Photographing outside is easier and will give you a more even light. However, you may have a problem with wind or rain!
Artificial lighting

If you’re selling a lot online, consider using tungsten, florescent, or external flash lighting to give a more consistent image.
The best effect is studio flash, as in the picture. However, after daylight, most people favour either tungsten or florescent – because their camera can’t use external flash, or to save money.
Tungsten lighting is simple and cheap, but can be hot in summer. You just need a reflector dish with a bulb socket which can be purchase from camera accessory stores. The brighter the bulb: the sharper the image. However, avoid a dark shadow by illuminating your item unevenly. If you can’t soften the shadow with a white card, try pointing your reflector to the ceiling and bouncing the light down.
More-even lighting is given with two reflectors and bulbs, but can produce a double shadow which looks terrible. A florescent tube will give you a softer light, although green in colour. You can correct this later using any image editor on your computer – same with the reddish colour of tungsten light (unless you use expensive daylight bulbs).
Flash lighting

Studio flash is the best, but you need a camera that has a flash socket and can synchronize – most small cameras can’t. More-advanced cameras may have a hot-shoe (the worst position for a flash), where an adapter can be fitted to allow an external unit to be plugged in. SLR digital cameras should have a normal socket for a flash plug and are the easiest to synchronize external flash.
Flash light also has the advantage of being daylight colour temperature, so you need less colour balancing later. Set the camera to manual exposure at around 1/60 second. More-even lighting is given with two or more external flashes, you can trigger extra units with a slave. If you’re using a studio flash unit, diffuse the light with a soft box, which is better than an umbrella which gives a harder light.
Background


Plain white does for most, but some items look better on a dark background, like matte dark-brown. Purchase matte card from an art shop, and curve between a wall and a table.
Avoid shiny backgrounds as they create hot spots (white spots on the image caused by reflection from your light). Usually light-coloured products are best on a light background, although there’s no hard rule. Except, keep it simple – the background shouldn’t distract. A light-tent, easily purchased on eBay, limits hot spots.
Exposure
Auto exposure will also work fine, but use a shutter speed of at least 1/60 second to prevent camera shake – unless using flash, where you’ll need full manual exposure. If your camera tells you the exposure setting, use the highest f number (smallest aperture). This will give you the sharpest possible image.
Experiment to get the correct exposure – there’s not a lot of room for error, but veer on the side of over (darker), rather than under exposure.
How to make your jewellery look good
To make your jewellery appear important, photograph it from the same level. With the item on a table, it’s easily to bring the camera down to the same height. Take a few pictures of each piece, re-focusing (if using manual) in between. Check the first pictures are sharp and correctly exposed before photographing many items.

Image software
However good the image, chances are it’ll still need enriching on an image editing program. This will crop, enhance the contrast, adjust brightness, and reduce the image’s size so it downloads fast online. Those with a slow connection won’t wait for big images.
One of the fastest and easiest image editors to use is ACDSee – not as sophisticated as Photoshop, but much cheaper and simpler to use.
Image Size
I find the best size for auctions and websites is around 500 pixels wide for a large landscape-shape picture. Your camera will record the picture as a JPEG, and it’s best to leave it in this format. The other common format, GIF, is for simple line images like logos or cartoons.
How MrBead Photographs
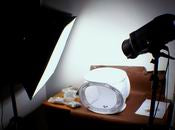
I use two studio flash units. One flash arranged at 45 degrees, and level to the product with a large soft-box attached – and another opposite, with a simple reflector to give a little modeling.
When photographing beads and small items, I place them inside a light tent to prevent hot spots.
I use a digital SLR with a wide-angle zoom macro lens, usually set at between f28 and f32. The shutter is 1/60 sec, but this isn’t important with flash. I focus manually, but on very-small items I pre-focus then move the camera back and forth to get the sharpest image in the viewfinder.
The camera’s screen is only viewed as a quick check after the photograph is taken. ACDSee is used to balance the colour, enhance contrast, crop, and reduce the size of the image. I then save to a hard-drive and upload a copy to the host server.
Sometimes, I just take the light box in the picture outside on a sunny day, and ‘bang a few shots off’ quickly with my iPad. You can buy one of these with a plastic background attached, on eBay.
Then I crop and lighten the image on the iPad and email to myself.

Tel: +44 (0)1603 951277
![]()
![]() No Internet?
No Internet?![]() Order By Phone!
Order By Phone!